My photography workflow, from ingest to backup
This may be one of the most important blog posts I will write for a long time.
After seeing several friends lose large bodies of work to theft, natural disaster, and simple carelessness, it really hit home to me how important workflow strategy is for photographers. Our images are our livelihood, yet all too often we do not take the steps to properly manage and protect them.
What follows is a step-by step guide on my approach to the high-volume workflow I use for daily news photojournalism. The video above shows the journey an assignment takes, from ingest to backup. This guide is a detailed explanation of the process, including the specific settings needed to set up a similar workflow.
Overview
My workflow is based on several key principles:
- Every image has a filename that is unique and can never be repeated again. By using the frame ID created in-camera, I can use this number while shooting to reference caption data.
- All images have basic metadata embedded on ingest. As every file gets this basic information, I can use OSX’s built-in tools to search my archives.
- Modified/toned images use the original base filename as an identification number, and are saved in the same working folder as the original take.
- Content is organized into a folder structure that allows for simple, regular backups.
Camera settings
(These are for Nikon, but there are similar Canon equivalents)
Color Profile: Vivid
This is often the only “toning” I need when shooting in natural light. As I shoot in RAW, this can be reset to Standard if necessary. DO NOT use this profile if only shooting in JPG.
Color Space: AdobeRGB
Always shoot in the widest color space, then convert to smaller spaces on output.
File name base: JHX (X = camera #, JH1, JH2, etc)
Prevents filename overlap, as you will see below.
World Time: All cameras matched to single reference
Allows for easy sorting of multi-camera takes.
IPTC Stationery Pad
I apply a large amount of metadata initially upon ingest, which ensures that I can easily track the files through the rest of the workflow. Using the following settings, the only changes I have to make between assignments are the City and Event fields.
Depending on the assignment, I might also add some basic caption information. The rest is automatically filled in automatically by variables (in the {} brackets), or doesn’t change between assignments.
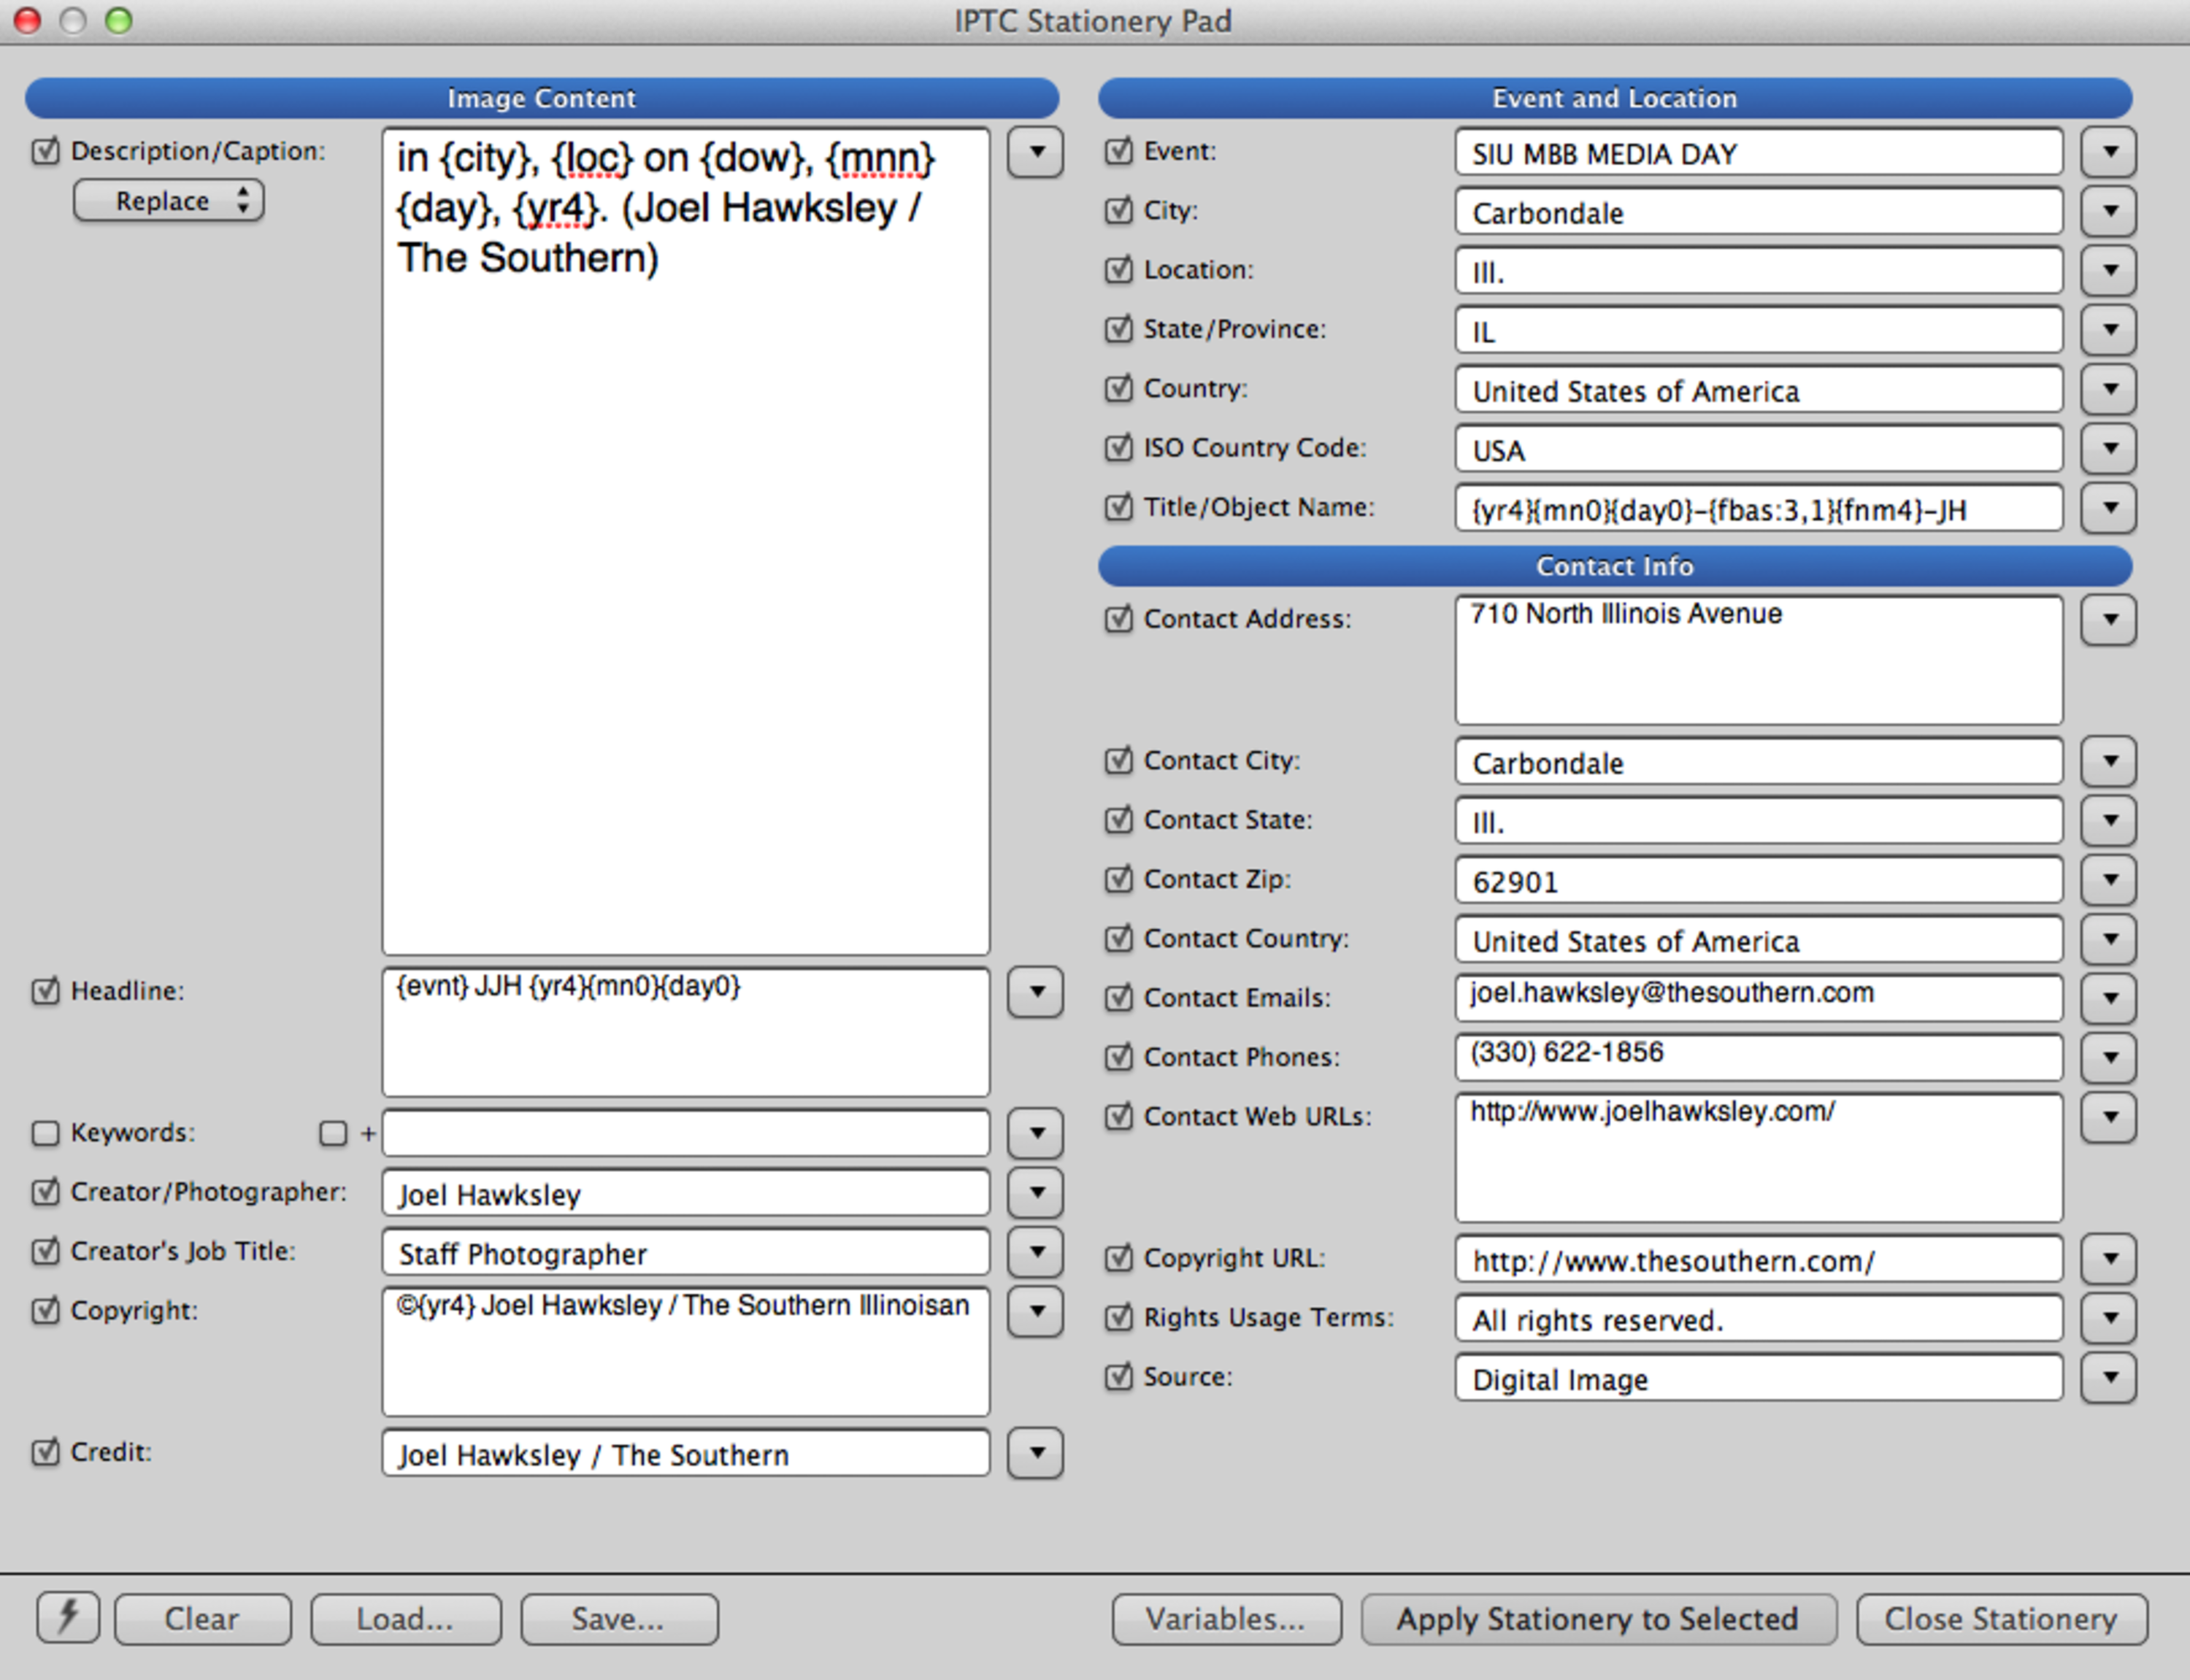 My IPTC Stationery Pad in Photo Mechanic
The most important fields are:
Description/Caption: in {city}, {loc} on {dow}, {mnn} {day}, {yr4}. (Joel Hawksley / The Southern)
Uses variables to produce the base of a standardized caption.
Headline: {evnt} JJH {yr4}{mn0}{day0}
Specific format for The Southern.
Copyright: ©{yr4} Joel Hawksley / The Southern Illinoisan
yr4 outputs the current year in four digits, in this case 2012)
Event: Shoot Name (Normally a standarized slug, such as SIU MBB MEDIA DAY)
Location: State name, in AP style (not a recommended use, but need this for style reasons)
Title/Object Name: {yr4}{mn0}{day0}-{fbas:3,1}{fnm4}-JH
Preserves the original reference file name in the case of saving to a different naming system for client use.
Ingest
My base ingest settings do not change. I use the {evnt} variable to load the slug from the Stationery Pad for the working folder name.
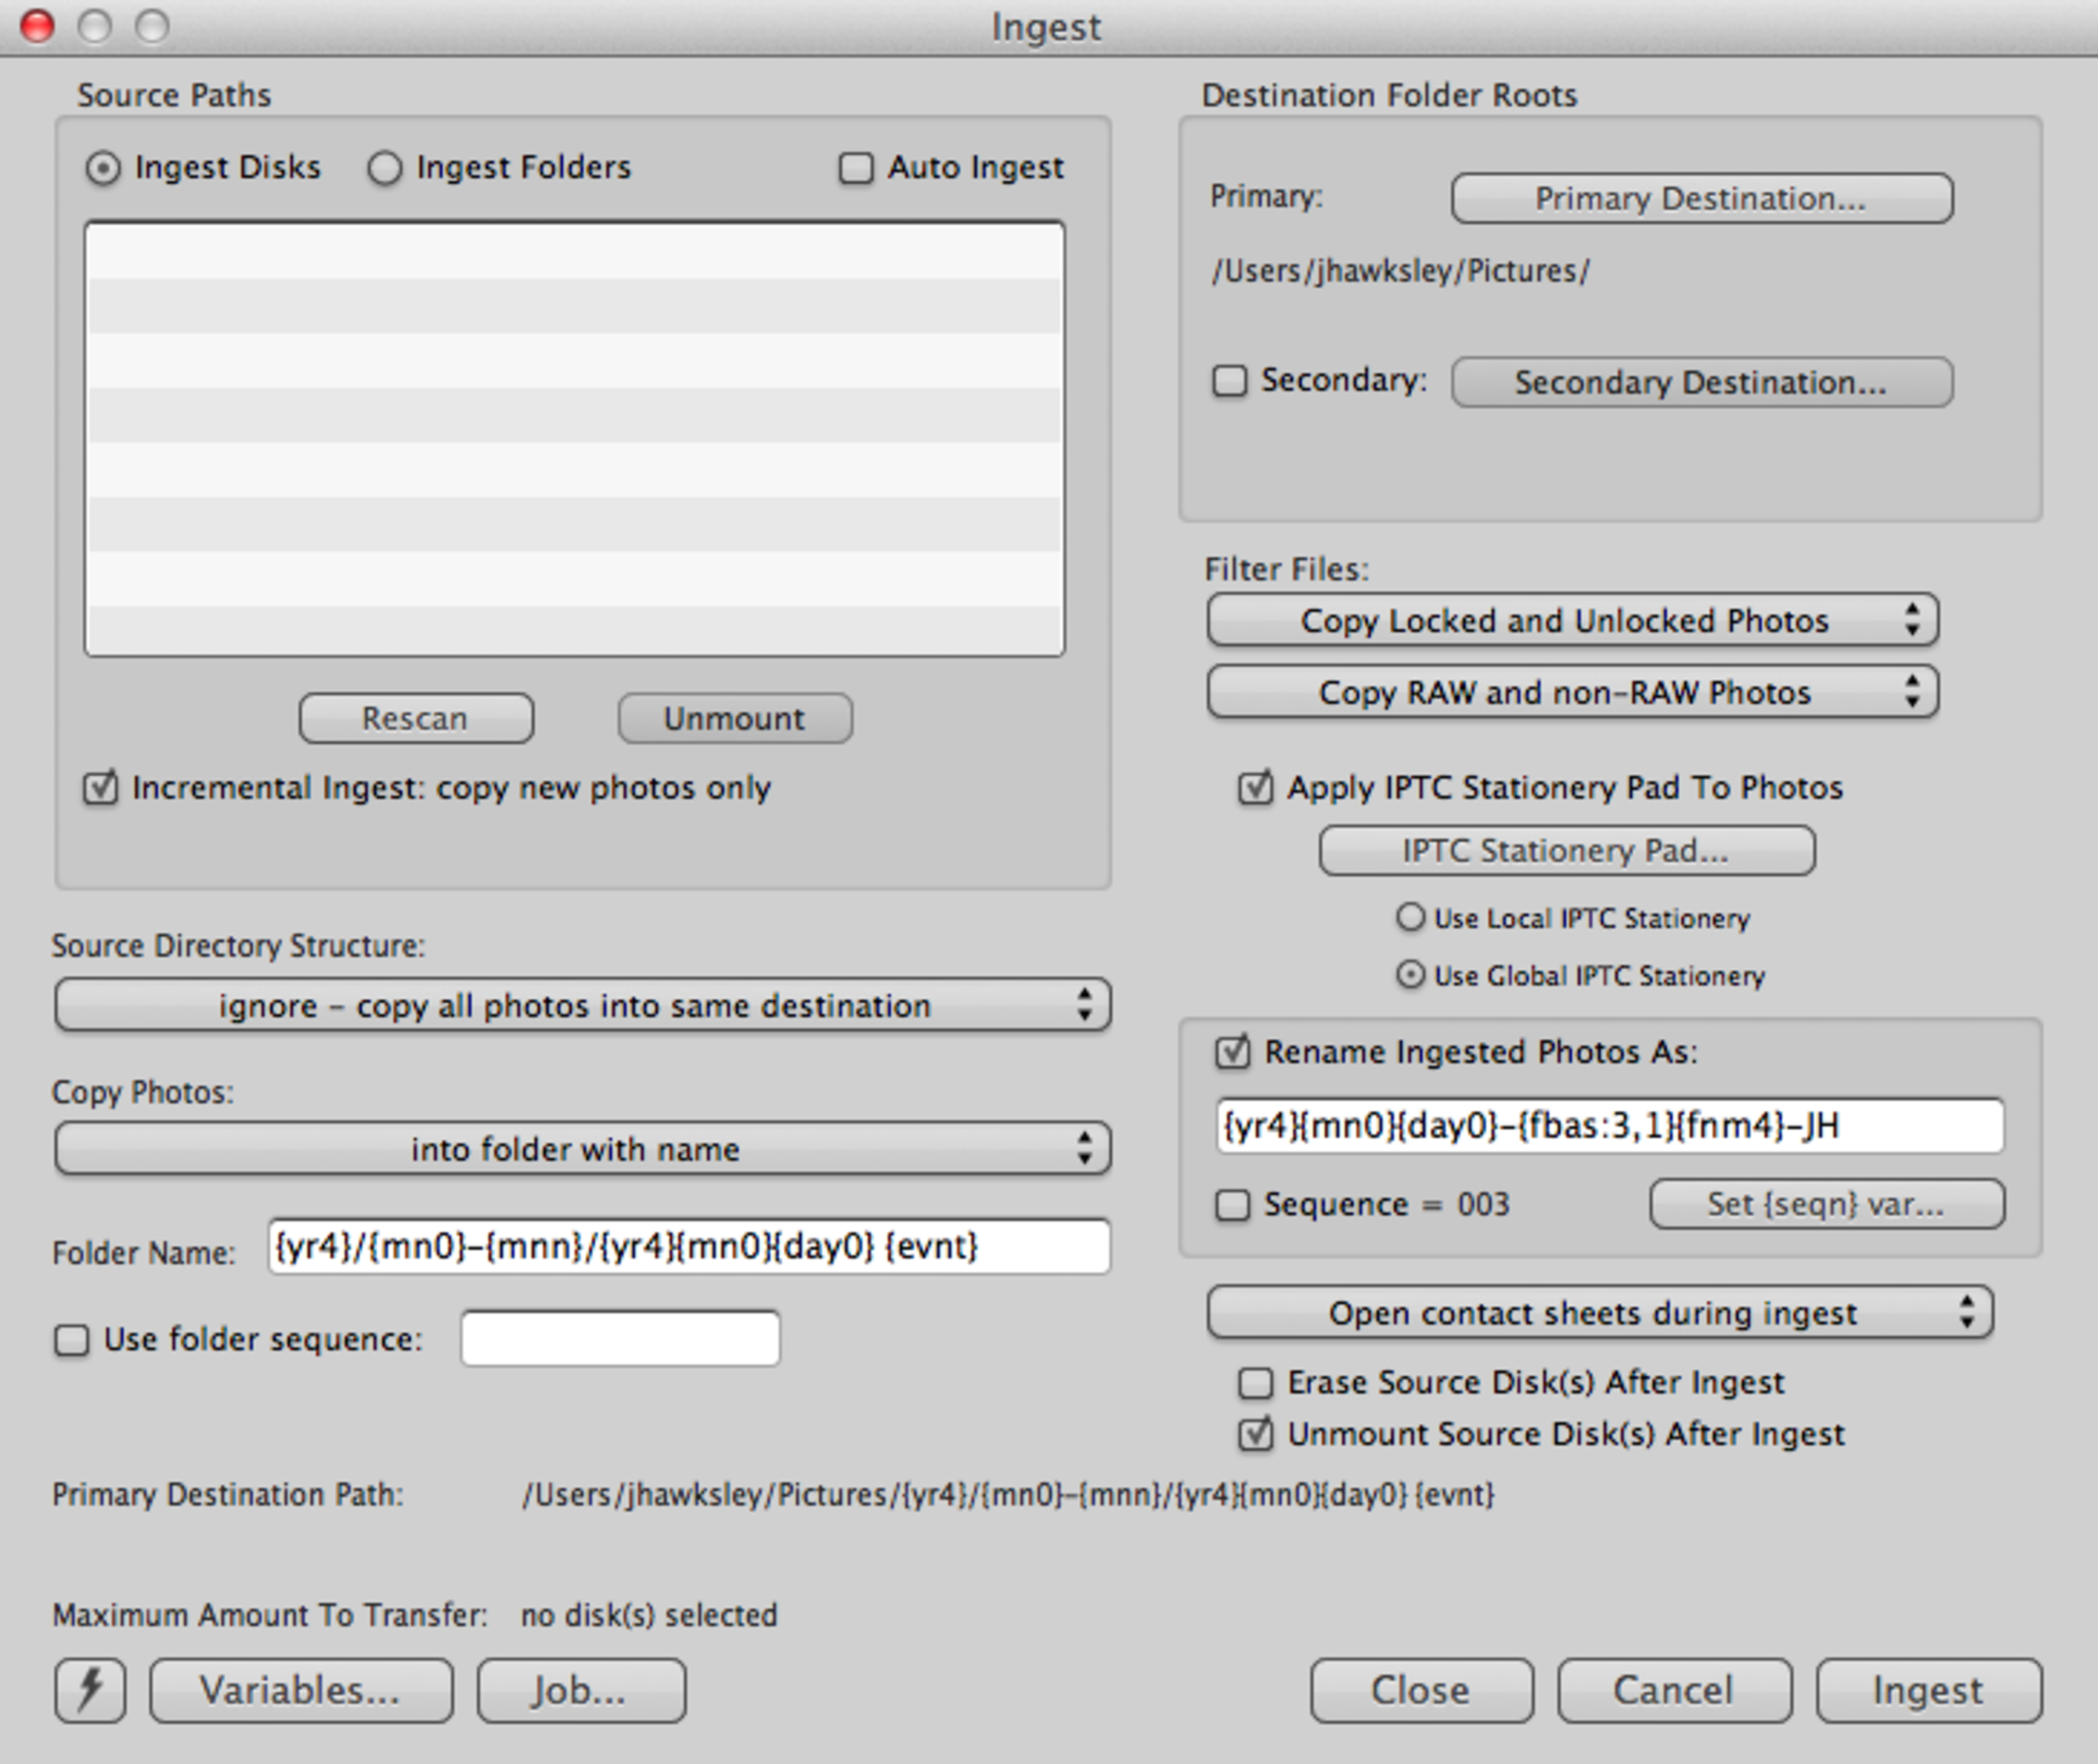
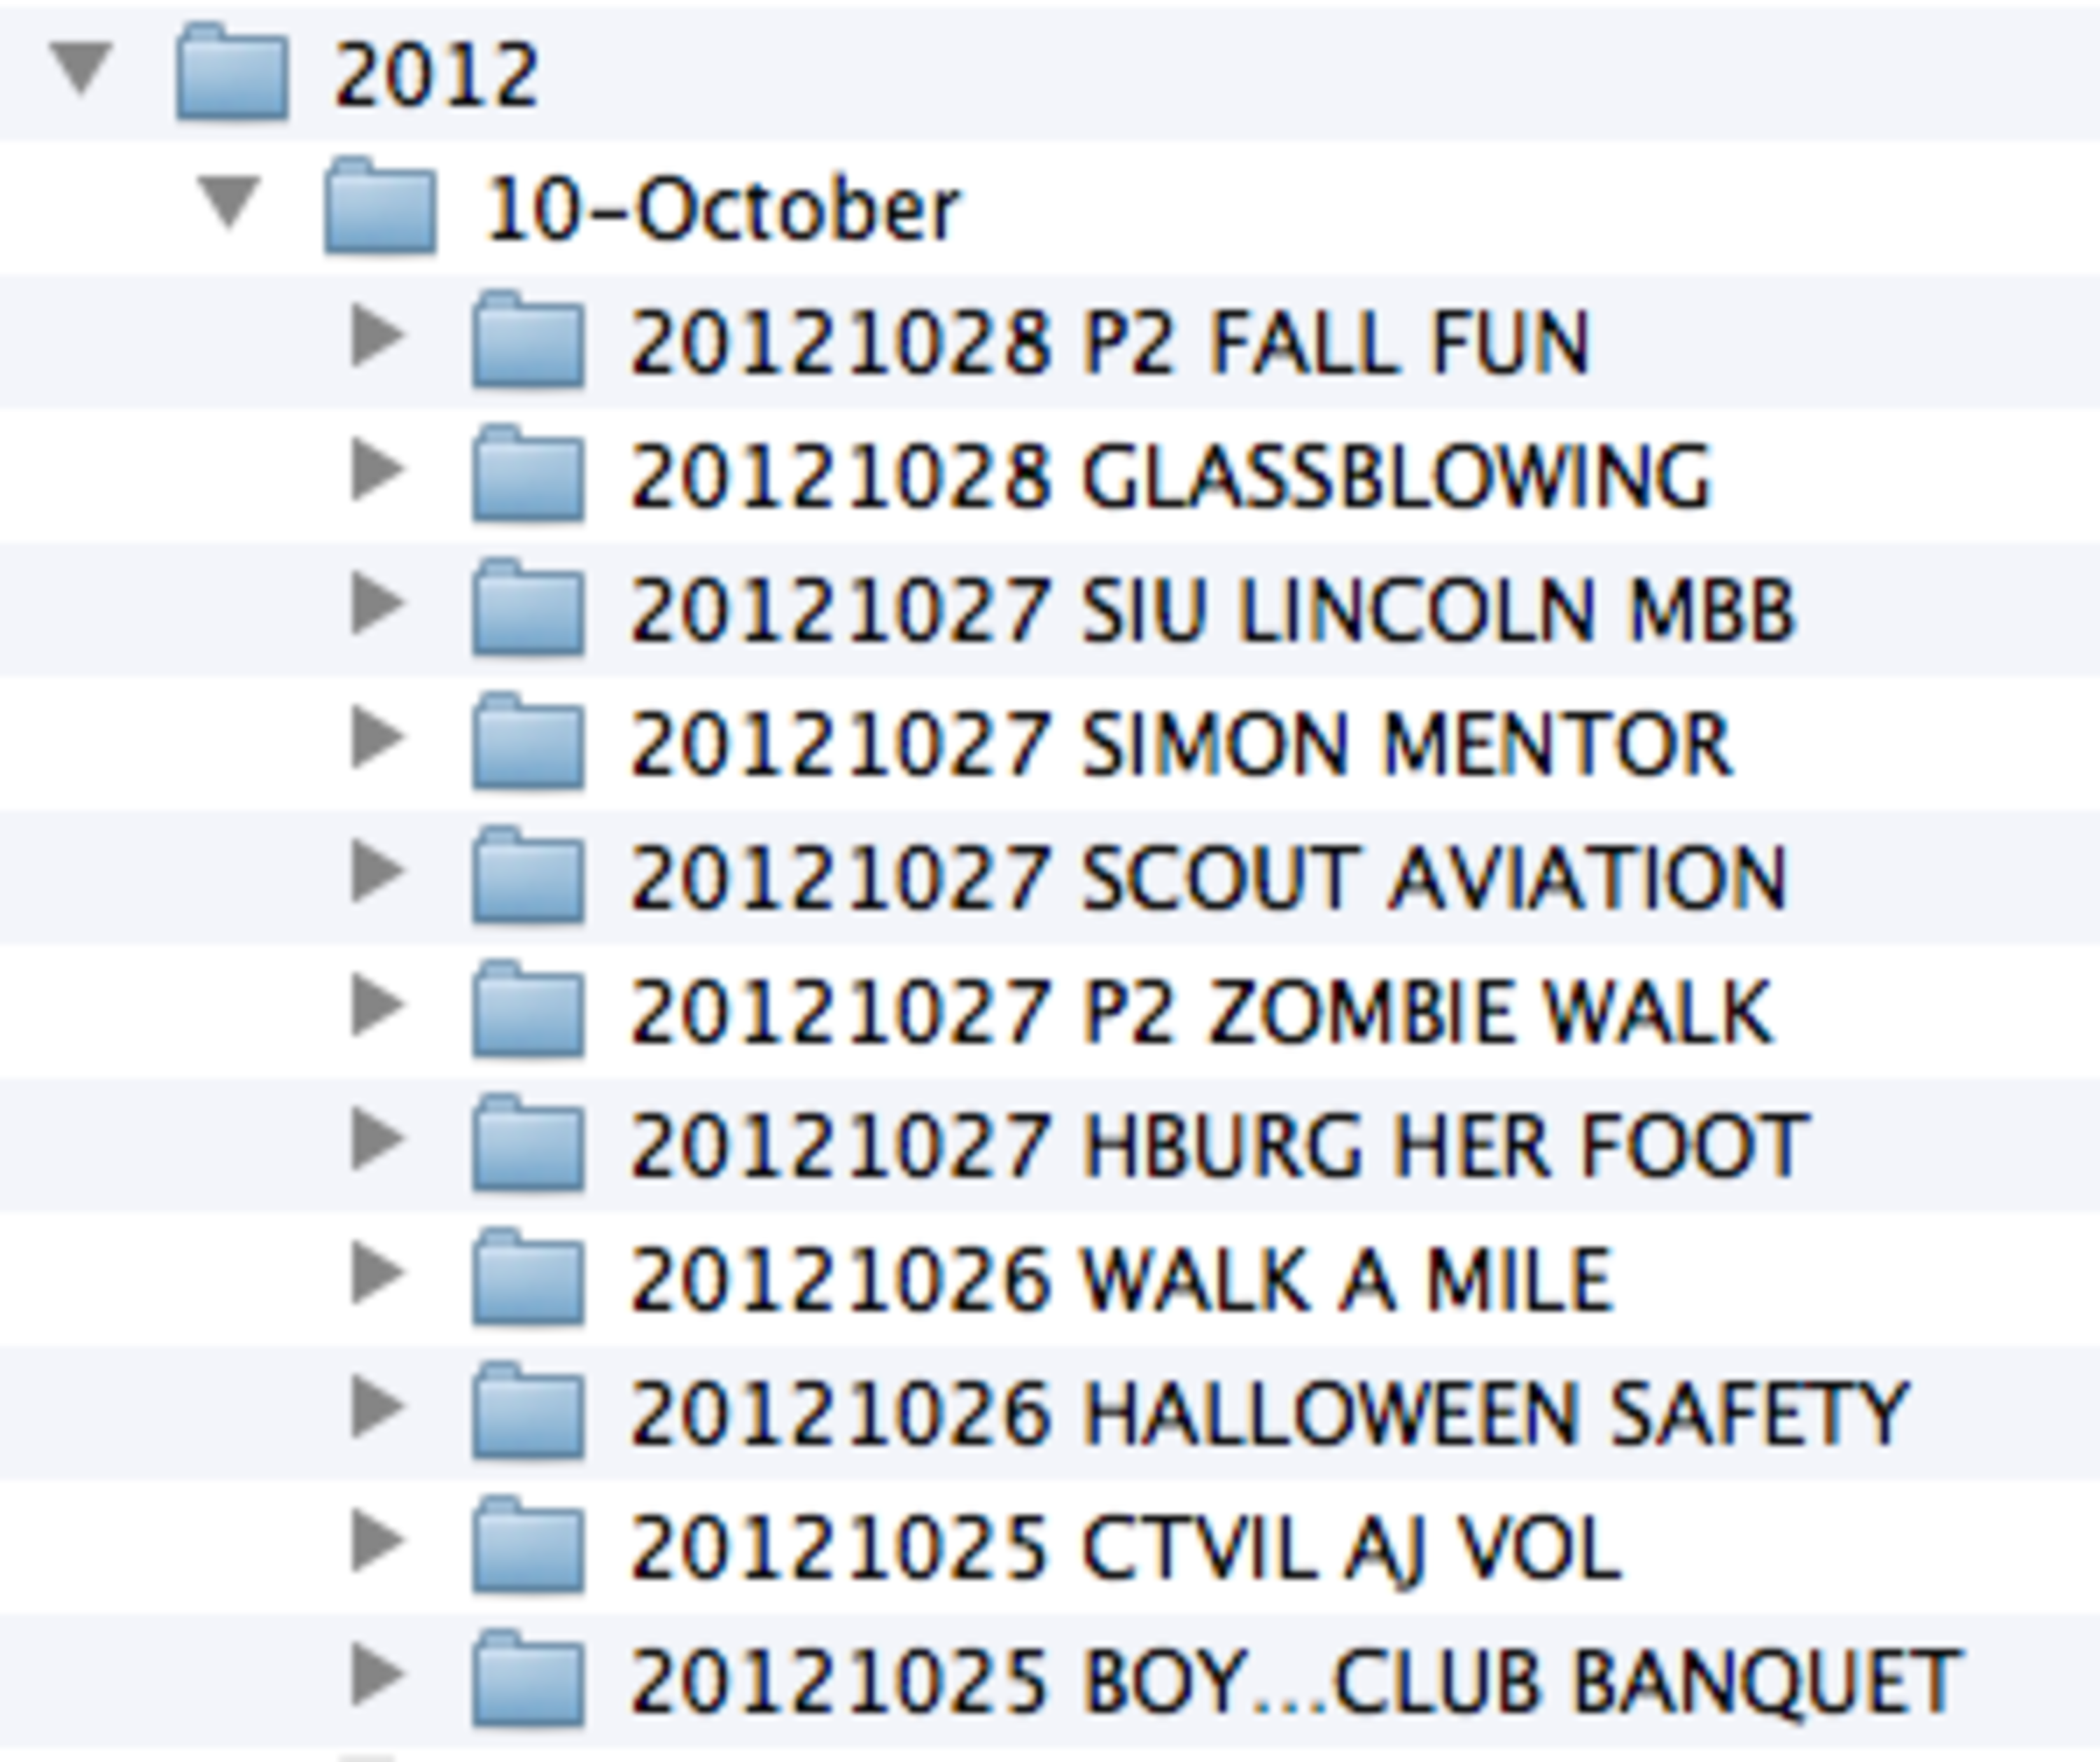 This folder structure is automatically created by Photo Mechanic.
Apply IPTC Stationary Pad To Photos
The most critical setting.
Incremental ingest: copy new photos only
Only downloads images for the current assignment.
Unmount Source Disk(s) After Ingest
Preps the reader for the next card.
Source Directory Structure: Ignore
Downloads every image on the card without any fuss.
Copy Photos: into folder with name: {yr4}/{mn0}-{mnn}/{yr4}{mn0}{day0} {evnt}
Builds the following folder structure automatically: 2012/10-October/20121025 Shoot Name
Rename ingested photos as: {yr4}{mn0}{day0}-{fbas:3,1}{fnm4}-JH
20121025-2(Camera #, see above)4562(root of filename from camera)-JH
Resulting in: 20121025-24562-JH. This unique name will never be repeated again.
Editing
While editing, I rank images on the following scale as I make passes through the take. I will typically only do the first three passes the day of the assignment.
Edit levels (Key/Color codes)
5/Green: Usable
4/Yellow: Web gallery
3/Orange: Print
2/Red: Best of week/month
1/Purple: Portfolio
Toning
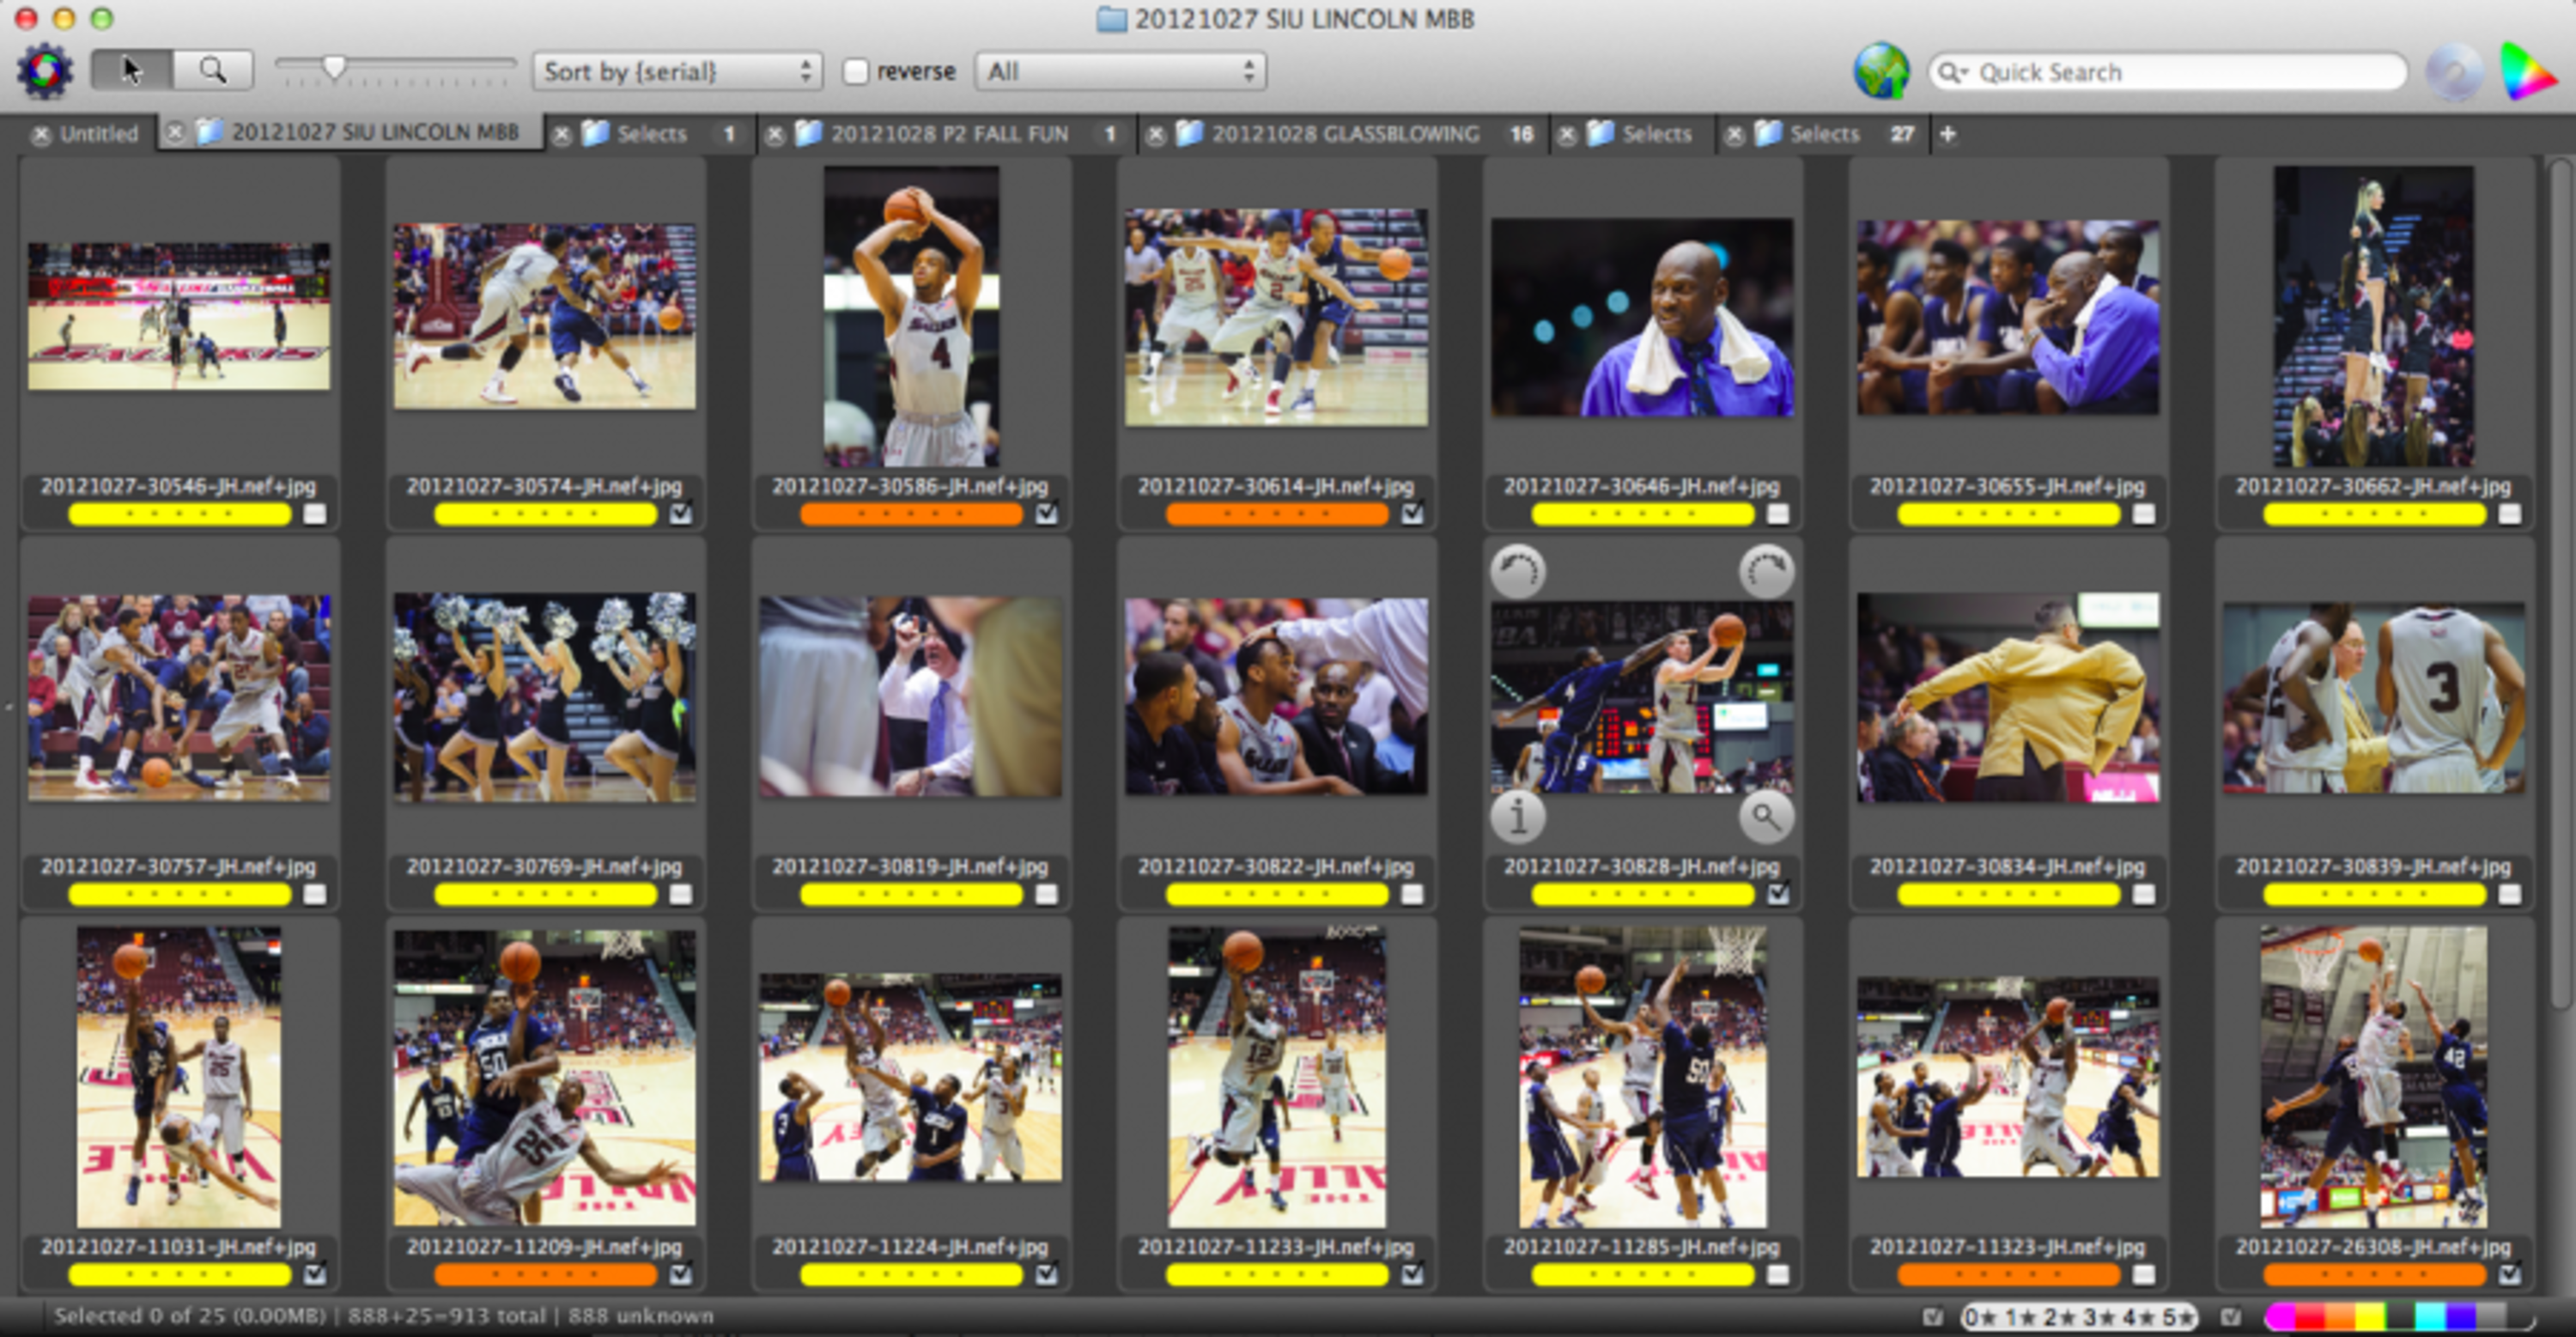 NEF (RAW) + JPG pairs in Photo Mechanic from a recent SIU men’s basketball game.
By using a more aggressive (Vivid) color profile, and doing my best to get my white balance and exposure correct in camera, I often just have to crop my images for output, which I do using Photo Mechanic’s built-in (and finally rotatable) crop tool.
When I need to tone, I normally do so between my second (Yellow) and third (Orange) edits, if I am not in a rush to make a print deadline. In that case, I will do all three edits first, then tone/deliver the images for print before working on the gallery content.
After working up the files in Camera Raw, I output JPGs saved at maximum quality to the same folder as the raw take. As the filenames match, Photo Mechanic automatically pairs the toned file with the original, which means that any caption/metadata is written to both files, not just the image prepared for delivery/output.
Output
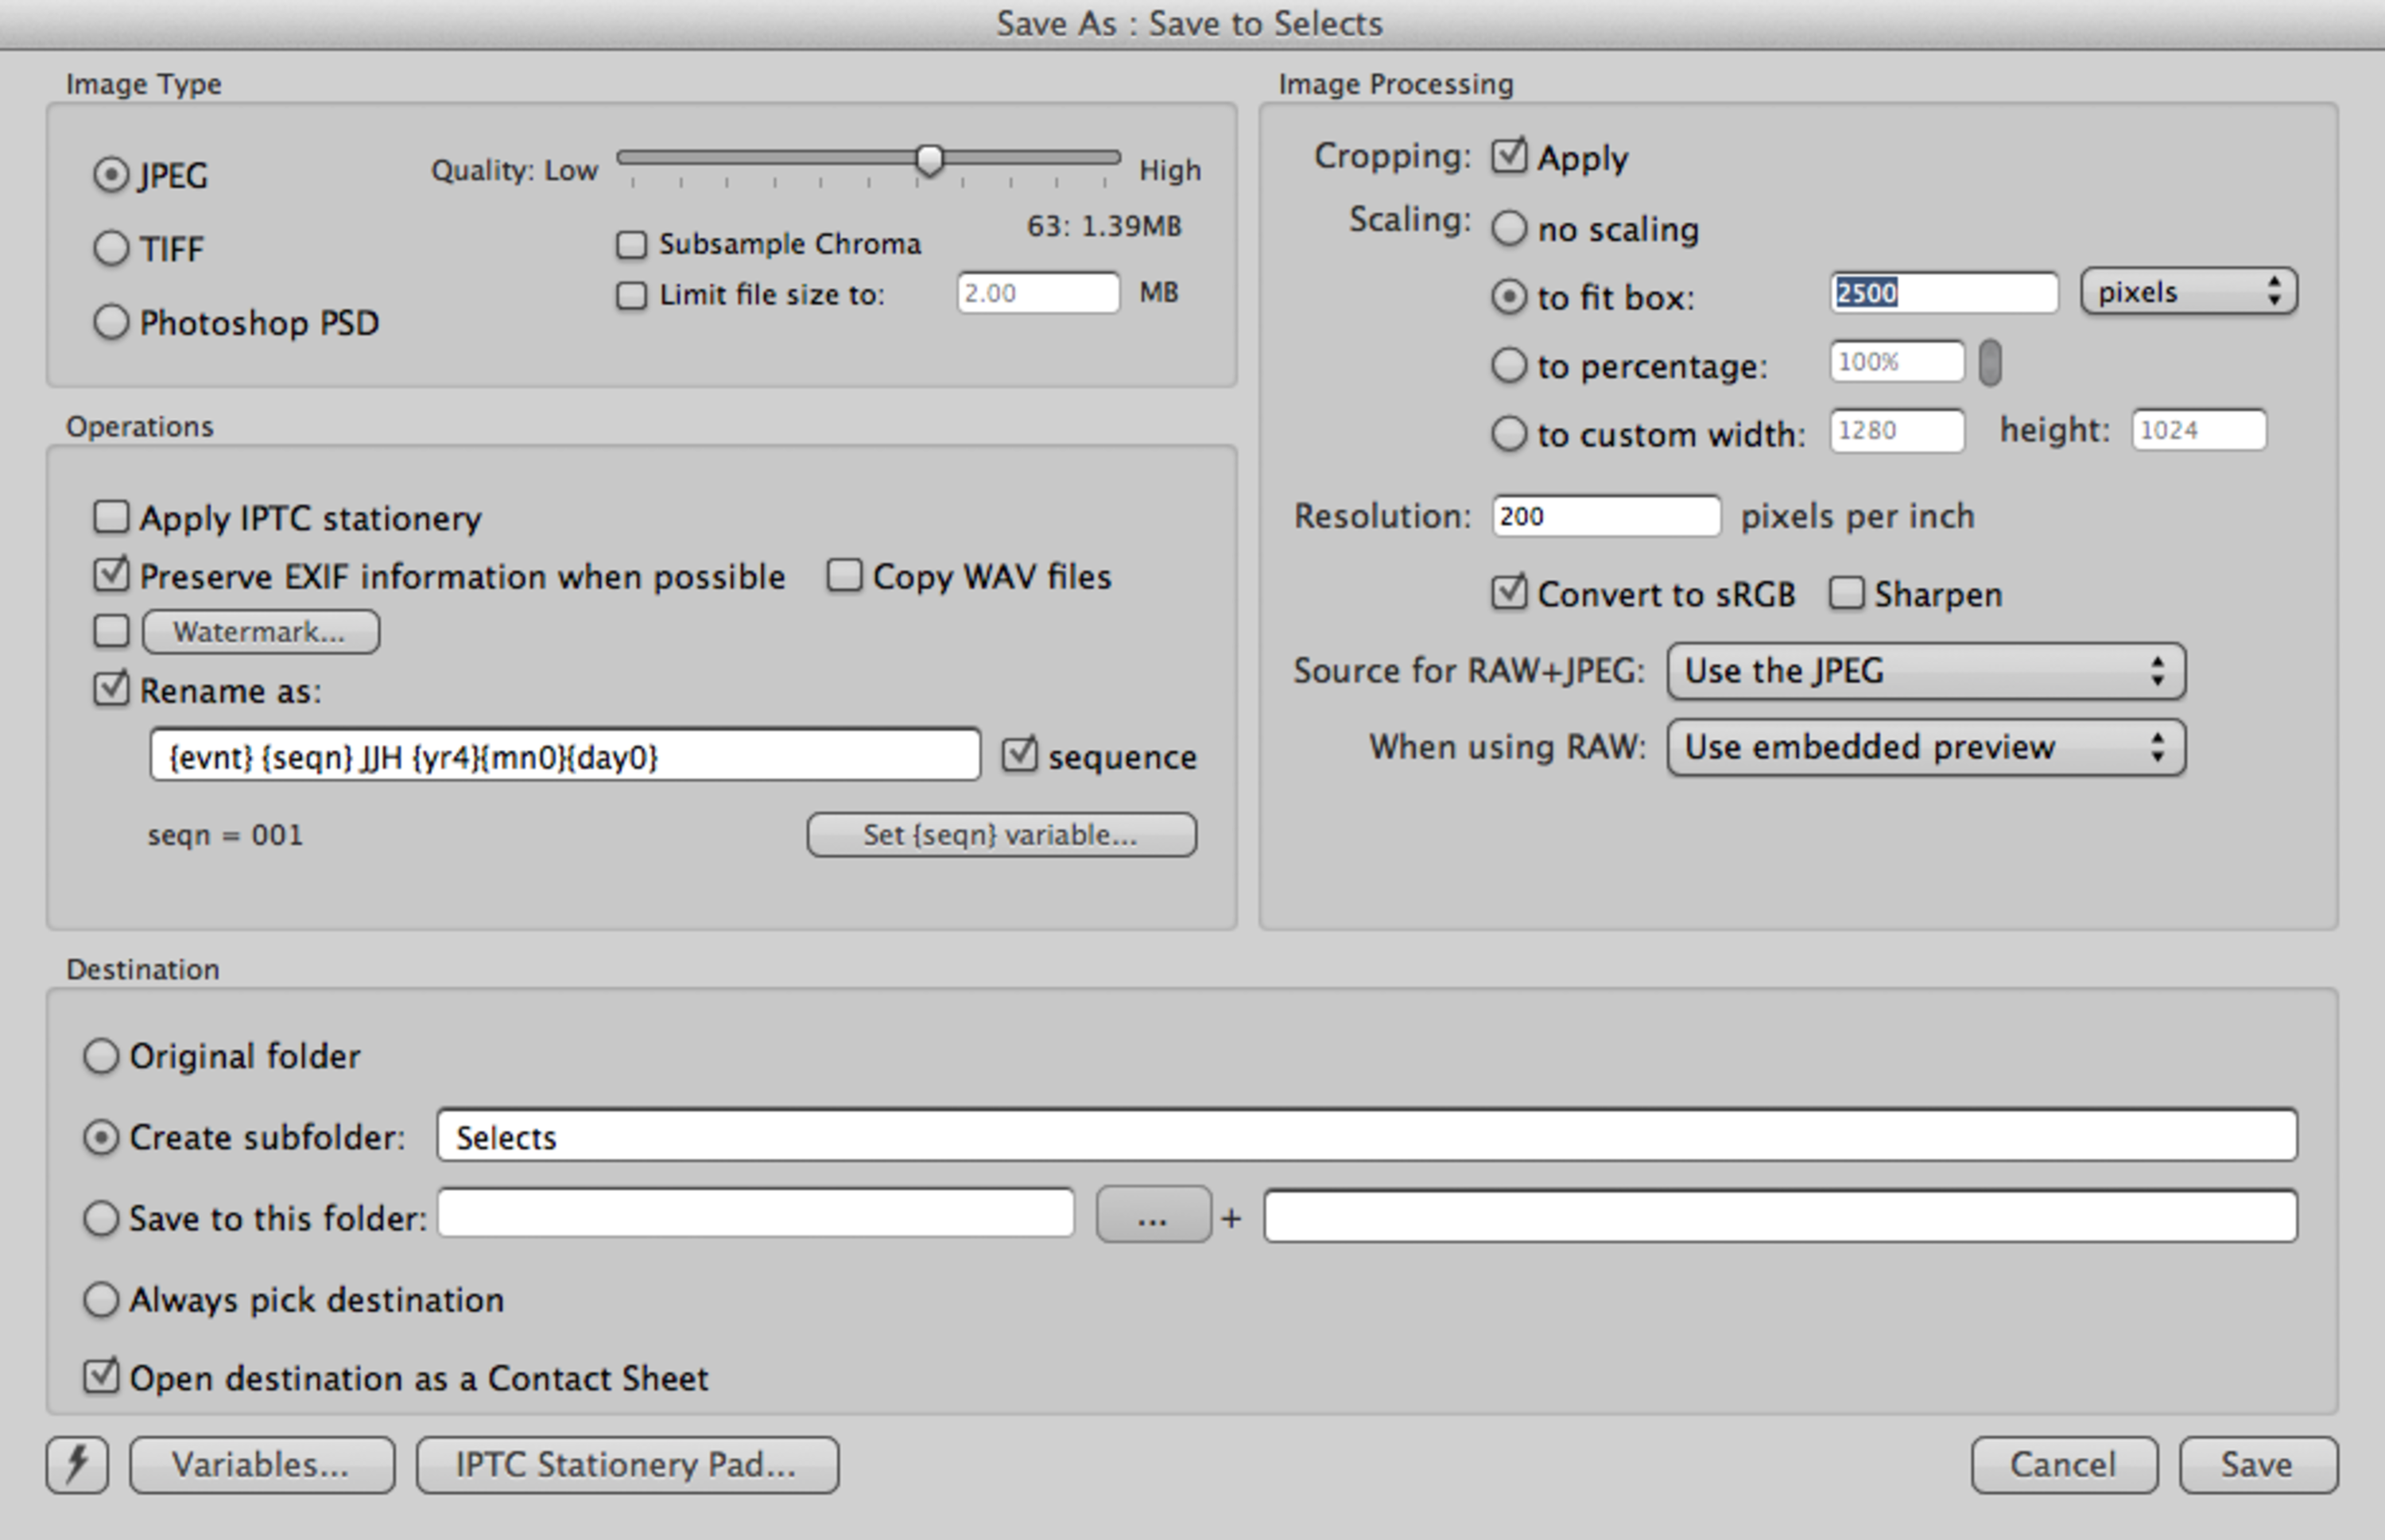 My output preset for The Southern.
Once the files are toned and captioned, I save the files to the specific settings requested by the client. For my daily work at The Southern, I save 2500px sRGB JPG files to a sub-folder labeled Selects, renamed to our specific convention.
From there, it is simply a matter of transmitting the files as necessary, which depends on whether I am editing on location or in the office.
Backup
Daily
On a daily basis, I ingest my cards after every assignment. This means that there are two copies of each file: one on the memory card and another on my laptop.
When I get home from the office, I copy the working folders from the laptop to a primary backup drive. Once I’ve verified the files are intact, I format my memory cards, leaving the working directories on my laptop and the backup drive.
Weekly
Every week, after writing my Week’s Work blog post, I copy the working folders from the laptop to the primary backup drive, then again to a second drive. Once a week, I rotate the second drive with another that is stored offsite in my desk at work. Once this transfer is verified, I remove the working folders from the laptop. This system keeps two copies of my files (once I’ve downloaded my cards) on a weekly basis, and three copies for the long term.
Keeping one of the copies offsite protects my archive from theft and natural disasters. In the worst case scenario, I would lose a week’s worth of RAW files, as my JPG selects are backed up on a server at work. My next goal is to back up my RAW selects to a cloud server on a daily basis, further protecting my most important work.
Wrapping up
It is important to note that while most of this workflow can be accomplished in other programs such as Bridge or Lightroom, I have yet to find an equivalent to Photo Mechanic’s variables, which are what make this specific workflow so simple to use on a daily basis.
I learned a lot of the underlying concepts of digital workflow from reading The DAM Book, which I recommend to anyone who is looking to build a workflow to fit their specific needs. It’s a dry read, but is pretty much the gold standard of workflow.
While this system works well for me, it may not be for everyone. The best workflow is one you’ll stick to and use for every image you take.